Technical Equipment#
Depending on the research question, the technical equipment must be selected.
Camera Selection#
The cameras are the centerpiece for collecting the data and should therefore, be selected with care.
The desired experimental area and possible camera mounting height help to determine the needed camera model with a fitting angle of view. A larger angle of view covers a larger area on the ground (experimental area), however, the increasing perspective view towards the image borders can occlude people from each other and from the setup structures within the experiment, like walls or bottlenecks (see Figure 1). Therefore, it might be helpful to install multiple overlapping cameras, with a smaller angle of view each, to create an overall larger experimental area.
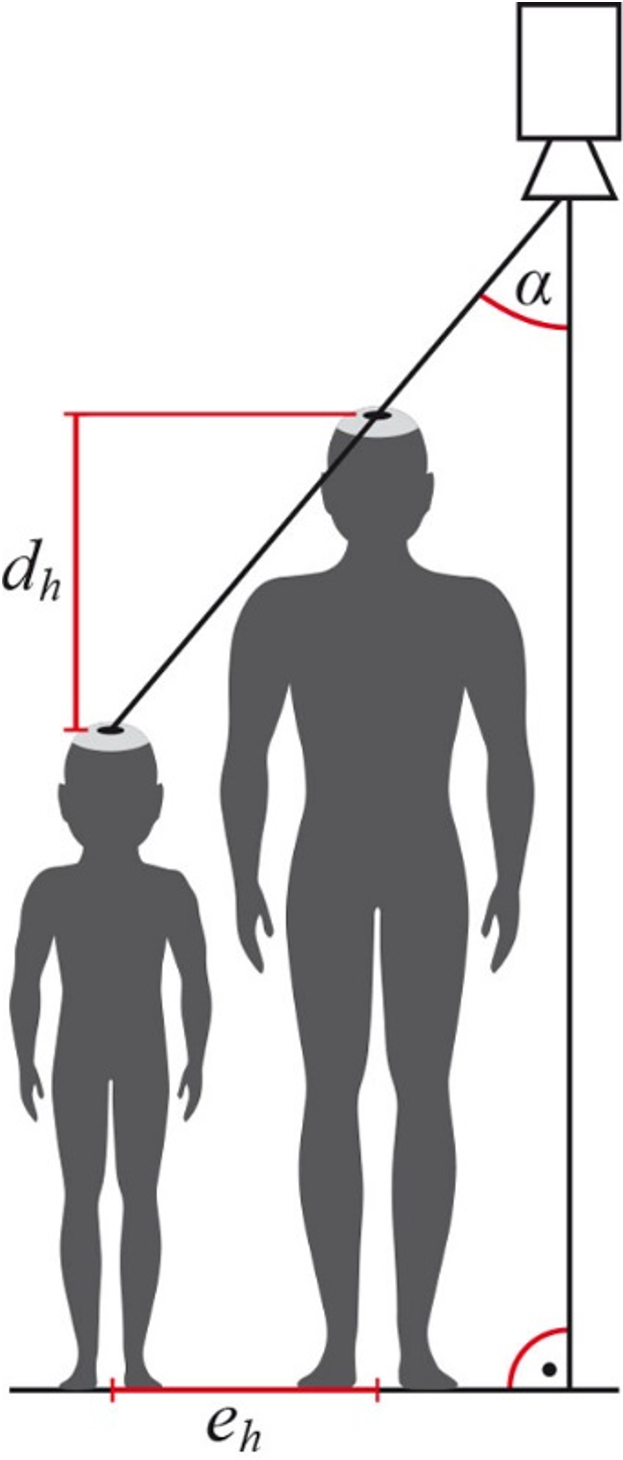
For a difference in size between two persons \(d_h\) depending on the angle \(\alpha\) to the camera plumb line or optical axis, the error in calculating the position in the movement plane is \(e_h = |d_h\tan\alpha|\).#
Even though, cameras with a smaller angle of view create better quality data, it can be helpful to install one camera with a large angle of view to capture the entire experimental area as a solely qualitative overview.
Camera Settings#
The selection of the camera settings should be carried out very carefully and should, if possible, be tested in the planned location under the same conditions as during the experiment. All camera setting should be selected manually and not be kept on an automatic setting. Some main settings to consider are
- Image resolution
The image resolution must be chosen so that the objects of interest are displayed in a clear manner. Keep in mind, that the resolution can be adapted based on the camera mounting height and that objects with greater detail (code marker) must be recorded with a higher resolution to be read out.
- Frame rate
The frame rate is sufficient with standard rates of 24 fps to 30 fps. For running people, increasing the frame rate can improve the tracking. However, a higher frame rate than 50 is not recommended since it unnecessarily increases the workload.
- Focus
The camera should be focused to the object of interest, mostly the participants’ head.
- Aperture size
If the camera allows aperture size changes, you should set it to a low value (high f-stop number), to ensure throughout sharpness in the image.
- Shutter speed
The shutter speed controls the motion blur within your image. For faster moving people you want your shutter speed to be smaller. However, keep in mind that a smaller shutter speed number also reduced the amount of light entering the camera. A low shutter speed that is not synchronized with the light can lead to a pumping of the brightness in the image.
- ISO
The ISO value should be kept as low as possible since a high value increases the image noise.
Important
The aperture size, shutter speed and ISO number all work hand in hand and all influence the brightness of the image. Changing one will influence the other settings as well.
- File format
The size of the storage media must match the planned recording duration for the selected recording format. The video recording should be set to full frame or progressive scan and no interlaced recording for the sequence of sub-fields should be taken.
Important
All camera parameters must be set manually so that they do not change during the experiment and thus possibly change the intrinsic calibration or influence the parameters for marker recognition.
Camera Mounting#
Before mounting the cameras, it should be considered if all necessary settings have been performed before the camera might be out of reach. Sufficient power supply should be ensured, with either an external battery or via cable.
When suspending the cameras, it is essential to ensure that they are secured against falling by attaching safety ropes, especially as people will often be walking underneath them.
Synchronization#
If multiple cameras, or other sensors, should be combined during the data analysis, synchronization actions should be performed during the experiment. This can either be an image based synchronization, e.g. a recording of an exact clock, or an audio based synchronization, e.g. a short loud sound. The synchronization should be performed multiple times throughout the day, to avoid long stretches without synchronization.